

However as much as I love the Chandelini right now I’m not sure if this is a piece that I’d love forever. At $6000.00, I know that Husband would insist that I love it forever.

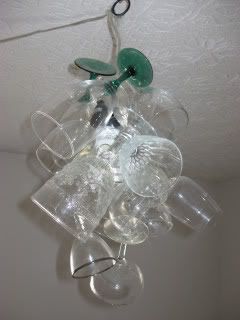
Well, shoot. If I can't have an expensive wine glass chandelier for my dining room, I figured that I could make one a less expensive inspired by design out of orphan wine glasses for my craft room.


How to Make a Hanging Lamp from Wine Glasses

Materials
1 sturdy curtain ring
15 stemmed glasses (I used a combination of wine, water, sherry, and old style champagne glasses)
Fishing line
Scissors
Jeweler’s crimp beads
Needle nose pliers (for crimping the beads shut)
A hanging lamp kit
Small lamp shade
Heavy cord or zip tie
A chair or door knob
1. Use the heavy cord or zip tie to attach the sturdy curtain ring to a chair or doorknob. This will keep the hanging wineglasses from tangling as you work.
2. Cut the fishing line into 15 various lengths with the scissors.
3. Tie a length of fishing line to the heavy curtain ring.
4. Slip a crimp bead onto the open end of the fishing line. Use
the pliers to crimp the bead around the knot to hold the knot into place.
5. Slide a crimp bead onto the open end of the fishing line.
6. Tie the open end of the fishing line (with the crimp bead still threaded on it) to the stem of a wineglass.
7. Use the pillars to crimp the bead around the knot and hold it into place at the base of the wineglass.
8. Repeat steps 3 through 7 until you have all of the wineglasses attached to the curtain ring.
9. Remove the paper cover from the small lampshade to reveal the wire lampshade frame.
10. Install the hanging light according to the directions that are in the hanging lamp kit.
11. Untie or cut the curtain ring and hanging glasses from the chair or doorknob.
12. Hang the curtain ring on the ceiling hook that you installed as part of the hanging lamp kit and arrange the wineglasses around the hanging light fixture.
13. Screw a low voltage light bulb into the lamp. A compact fluorescent light bulb is an excellent choice because CFLs are low voltage as well as energy efficient.
14. Clip the lampshade frame to the underside of the hanging light bulb. This will keep the light bulb in the center of the wineglass cluster.
15. Turn on the light and admire the view!

Did you enjoy this post? Get more like it by subscribing to the Condo Blues RSS Feed or to Condo Blues by Email.
15 comments :
That's amazing - it looks so awesome! Great job!
Cheers,
Deb
Wow, that's gorgeous. I now want one...I'd better get busy ;-D
This is very cool. What a clever idea!!
You are the best!! Very ingenious to make one yourself. Thanks for sharing this with all blogdom. Linda
$6,000.00?!?!?!?!??!?! I like your creative ingenuity MUCH better! Thanks for linking this up to gettin' crafty on hump day! :)
What a fun idea! Thanks for linking up at Giggles, Glitz & Glam!
Now that is pretty clever.
I am visiting from the CSI project. I am numbers 86,87,88, and 89.
Cheri from www.itssoverycheri.com and www.thediyclub.com
Very Cool! But the hubs is right at 6Gs! Must. Love. Forever. Great ingenuity!
Thanks for linking up to Making It With Allie! I can't wait to see what you have for next week!
AllieMakes.Blogspot.com
I like your idea of using orphaned glasses and making your own, as opposed to spending a whopping $6,000.00 on one. Great job!
Thanks for linking to the party.
Liz @ the Brambleberry Cottage
http://thebrambleberrycottage.blogspot.com/
This is a fantastic idea, but, fishing line degrades over time, so if this is intended to last longer than, say a year, I would use tiger tail to attach the wine glasses. Tiger tail is plastic coated wire for making jewelery and would last longer and be safer.
Wow!! I LOVE this. Thanks for sharing how to make it.
Wow! Now that's a chandy I've never seen before! I love it when people suprise me with creativity! Thanks for sharing! ~ Kim
super chick! except...how'm i gonna drink my wine now?
Oh wow what fun! And totally genius!
Linking to this cool project on Dollar Store Crafts on 11/3. URL will be: http://dollarstorecrafts.com/2011/11/diy-wine-glass-chandelier/
Post a Comment
I love comments and read them all! If you’re shy and don’t want your opinions made public, you can always email me at condoblues [at] gmail [dot] com.